Installing the myControlServer Host Application
Download the installation file for the operating system you are running on your host machine (Windows or Linux).
Execute the installer (with Administrator privileges) and the app should automatically start after a successful install.
(click here to display detailed installation instructions on Linux)
Linux Installation
Extract the myControlServer_linux.tar archive in your home folder and then open a terminal at the extracted folder.
The following command should then be executed to start the myControlServer application (note: the super user elevation is required for Bluetooth communication):
sudo ./myCS
Java is required as a separate installation to run the myControlServer application on Linux. Use the following command to install the latest version of the Java Runtime Environment (JRE) if you do not already have the package:
sudo apt-get install openjdk-7-jdk openjdk-7-jre
The BlueZ protocol stack is also required to use Bluetooth via Java on Linux. This can be installed as follows:
[ Ubuntu ]
sudo apt-get install libbluetooth-dev
OR
[ Fedora ]
yum install bluez-libs-devel
myControlServer Overview
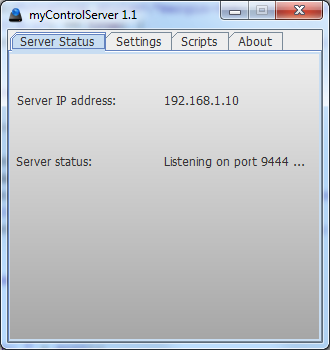
The main myControlServer screen will display the Server Status, indicating the IP address that will be accepting wifi
connections and the UDP port for the socket opened. When a client connects to the host - the status will be updated and
additionally display the client IP. The "(Auth)" suffix will be shown if the client has been authenticated (ie. a password
has been successfully submitted).
Tip: You can click on the server IP address displayed to copy the value to the clipboard.


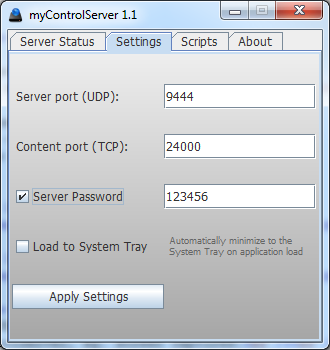
The Settings tab can be selected to update the server configuration. The server port (UDP) can be specified here. A content
port is also configurable - which is used to serve media from the myControlServer, eg. screen captures.
A server password can be set by enabling the check box. With a password enabled all clients will have to authenticate using
the value entered to successfully connect to the server.
The "Load to System Tray" setting will automatically minimize the myControlServer app to the system tray when it is
loaded. Click the "Apply Settings" button to commit any changes to the server configuration.
For information regarding the Scripts tab please refer to the myControl Automation page.
Installing the myControl App
The myControl app can be downloaded from the Google Play store. Currently Android is the only platform supported for
the remote device. Our plan is to add support for additional mobile platforms in the future.
Connecting to the Server
The first screen to be displayed upon loading the myControl app is the connection dialog. The IP address of the host
machine (running the myControlServer app) should be entered here, along with the server port (UDP). Once the values
have been entered the "Connect" button will attempt to establish the connection.
Tip: Make sure you have a wifi network connection enabled on your device before selecting "Connect".


When a password is set via the myControlServer app an additional dialog will be displayed prompting the user to
enter the password for authentication. The "Remember server passwords" check box can be selected to cache the
password on the remote device. Note: a single password will be cached for each network address.
Connecting via Bluetooth
Click the "Connect via Bluetooth" button to initiate communications via Bluetooth (note: an IP address is not required
when connecting via Bluetooth). A screen will then be displayed for the purpose of scanning for nearby Bluetooth devices.
Once the server entry is selected on the mobile device the host should initiate a similar scan to complete the pairing
process. A pass key may be required as governed by the host configuration.
myControl User Interface
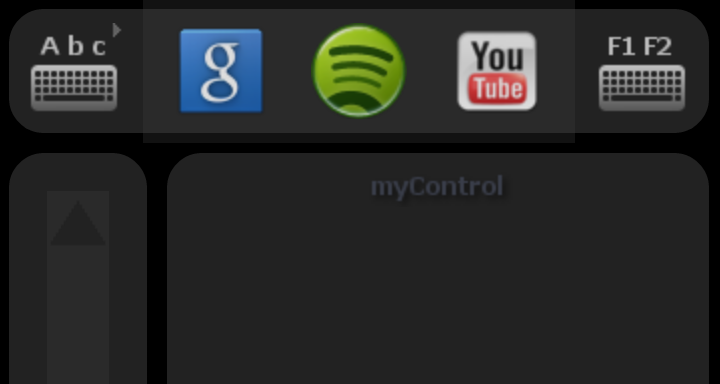
The myControl interface is split in to four basic sections: the menu bar, the track area, the scroll bar and the mouse /
command buttons. The menu bar displays a shortcut to the text input area (which can be toggled on and off) in the top
left corner. A shortcut to the special keys menu is in the top right corner and a list of scripts added to the device
is displayed across the middle.
Tip: You can hold down (long press) the special keys shortcut to bring up the Options menu.


The track area takes up most of the screen. This area functions as a virtual mouse pad to emulate cursor movement on the
host machine. By default you can also tap the track area once to simulate a mouse click, or hold down for a few seconds to
simulate a secondary (right) mouse click. The scroll bar (shown on the left hand side of the screen by default) can be
swiped (or tapped) up and down to simulate mouse wheel movement on the host.
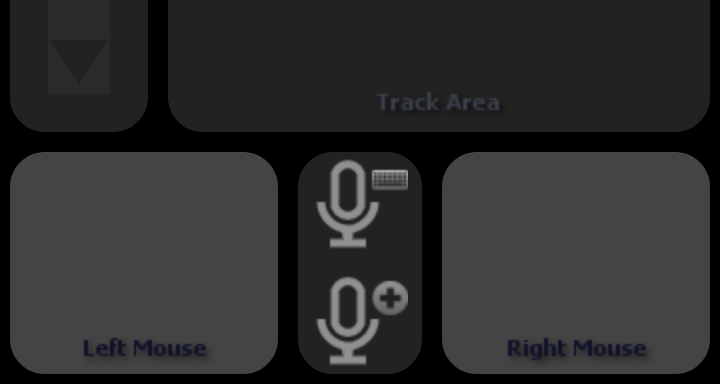
At the bottom of the myControl interface there are four buttons. The left hand button triggers the left mouse button and
likewise the right hand button triggers the right mouse button. These buttons can also used to emulate double click events
on the host. Hold down either button and then use the track area to simulate a drag event (for devices that support multi touch).
The two buttons at the center activate the voice controls. The top-most voice control button is for dictation purposes and will
convert the speech that you submit in to text input on the host. The lower voice control button can be used to execute a script
with additional voice parameters (please consult the Automation page for more information).
These buttons will not be displayed if your device does not support voice recognition.
Pressing the menu button on your device (or long pressing the special keys shortcut) will bring up the Options menu. Here you
can access the myControl preferences (see below) by selecting "Options" or you can capture a screen shot from the host display
by selecting "Capture Screen Shot". Scripts can also be managed on the Options menu via the "Add Scripts" and "Refresh Scripts"
entries respectively.
Script Execution
A scrollable list of scripts will be displayed at the top on the myControl interface (in the menu bar). By default no scripts
will be visible - click the "Add Script" button to add a script. The script availability is managed server side via the
myControlServer app (see the Automation page for more details).
Tip: The most recent script added will always be listed as the first icon.
Selecting an icon from the script menu will execute the corresponding code on the host machine. Scripts can also be executed
via voice command (so that additional parameters can be delivered, eg. a track to be played on Spotify).
Hold down (long press) a script icon to access the additional commands: "Remove Script" and "Enable text input". Selecting
"Remove Script" will remove the icon from the device menu, it can then be added back again via "Add Script" as required.
Selecting "Enable text input" will automatically highlight the text input area after script execution - this can be useful for
example when using the "Google Search" script.
myControl Preferences
Server Port (UDP): the port that the myControl app will attempt to connect to by default
Single Tap Click: when enabled a tap on the track area will send a primary mouse click event to the host
Mouse Acceleration: when enabled cursor movement on the host will be accelerated / smoothed where supported
Reverse Mouse Buttons: when enabled the right mouse button will be primary (left mouse is primary by default)
Scroll Bar Preference: controls the visibility of the scroll bar area on the myControl interface
Single Script Voice Activation: when enabled the selected script will load without the requirement of a vocal cue
Keep Screen On: when enabled the myControl app will keep the device screen on (in interface mode)
Control Interface: the behaviour of the interface as device is tilted (fixed orientation or rotate with device)
Full Screen Interface: when enabled the myControl interface will fill the device screen
Auto Dim System Bar: when enabled the system bar will be hidden (for Honeycomb / tablet devices)
Auto Un-focus Text Input: when enabled the text input control will be un-focused when the track area is in use
Show Bluetooth Connection: disable this preference to hide the 'Connect to Bluetooth' button on the start screen
Remember Server Passwords: when enabled a server password will be cached for each IP address
|